Monday, April 22, 2013

TAI SHUI HANG TRAIL (Discovery Bay - Mui Wo Trail)

This trail is satisfactory in terms of terrain and scenic views. It consist of tarmac trail and atleast 70% natural rugged terrain. This section can both be done from Discovery Bay (Tai Pak Wan) or from Silver Mine Bay (Ngan Kwong Wan) to  Mui Wo Ferry Terminal. It's great to visit this trail anytime of the year but as for me, I'd prefer doing it on the weekend because you'll get yourself rewarded on the festivity vibe on either ending point after atleast 2 hour of Hike. 

TRANSPORTATION:

(From DISCOVERY BAY)
  • Take the ferry to Discovery Bay and walk uphill to Discovery Valley Road until you reach the Discovery Bay Reservoir.
  • Take the MTR and Get Off at "Sunny Bay Station" then take any bus that will lead you to Discovery Bay. Get off next to DB Residence Club and walk uphill to to Discovery Valley Road until you reach DB Reservoir.
(From MUI WO)
  • Walk along "Tung Wan Tau Road" and from here you will pass the Silver Mine Bay until you reach a section with a stair heading uphill next to a sandy color lavatory and residential houses. 

LOGISTICS:
  • At least 500ml of Hydration.
  • Hiking Pole (Optional)
  • Extra Shirt (During Summer)
  • Swimwear (If you wish to take a dip during summer)
  • Convertible Pants (Pants to Shorts vice-versa)
  • Arm Protector (Optional but to prevent scratches)
  • A good spiky running shoes will do the job

LET'S GO!

DB RESERVOIR
(Note: This trail is done from Discovery Bay to Mui Wo or Silver Mine Bay)

STARTING POINT
After walking uphill along Discovery Valley Road and pass the DB Reservoir you will see get meet this "Flyover", and the starting area is just around the left bend with a green board signage that says "Mui Wo" and "Trappist Monastery". 


In this section, you will now start to hike on the natural and maintained trail.

Almost everywhere is like this type of terrain so you better have a good
spiky shoes cos it can be too slippery when rain.

Don't get lost!
With that Blue Signage board you'll never miss a turn.

This is just the main scene as you walk along this wonderful trail..."Discovery Bay" 

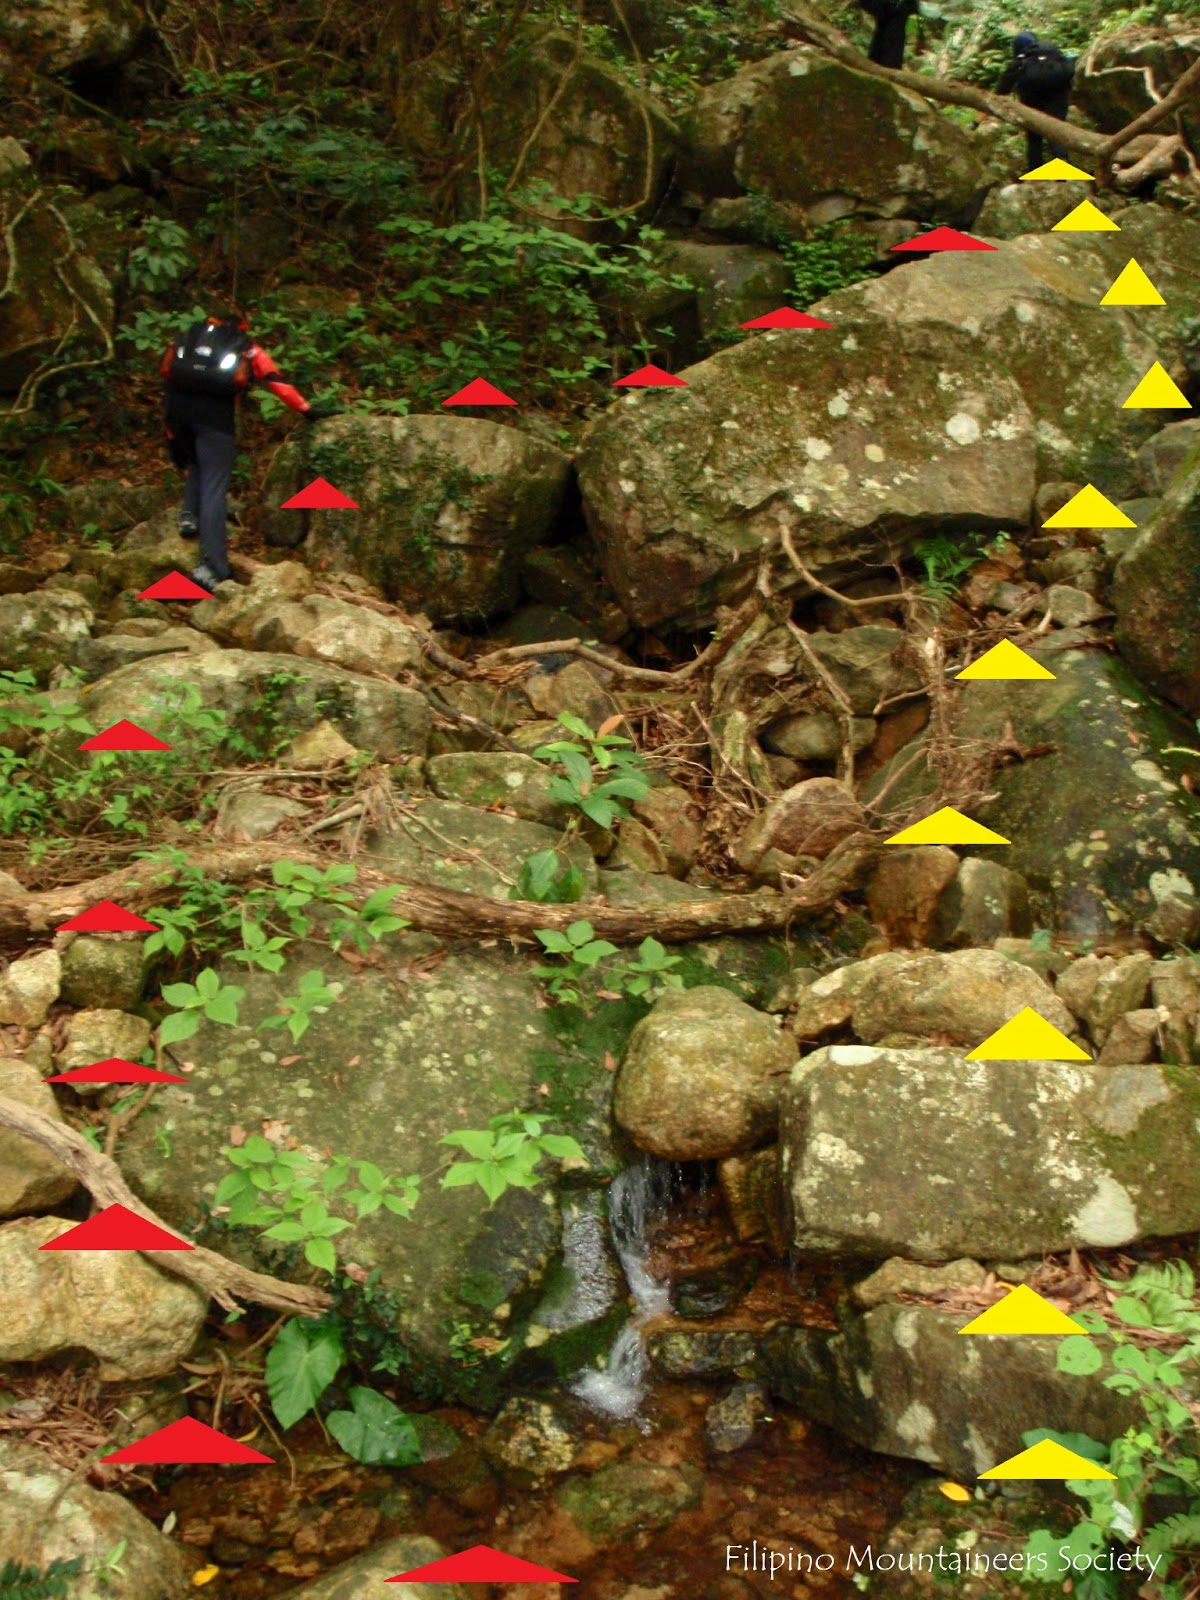
Here comes the rough part!
You will start to negotiate to too many ups and down and side winding along the beginning of trail but this is where you will need to cross the mini stream and Hike thru the bushes.

The Mini Stream
There's a signage that could cause some confusion  but  it's easy, just follow the signage that says "Mui Wo" and you will cross this mini stream.

After crossing the Stream, you are now bound to negotiate thru the shrubland so prepare those arm-cover or scratch protectors.    

Oh YES!
You are going to Hike that Mountain and it's last don't worry (^.^)
...and for sure you will be celebrating on the other side! 

SUMMIT
Tai Shui Hang 276masl

After a good uphill Hike and Summit reach at Tai Shui Hang, then  you will see your bearings to end the Hike. Along this section you will encounter a junction and you will get to see a stairs uphill towards the early morning hikers and fitness enthusiast. But you will need to keep going to the right side and enter the jungle again (^.^) don't worry...it's very easy! 

Read the sign and know your bearings..."Mui Wo".

After trekking thru the jungle, you are now bound to walk along the concrete stairs and road again
....until you reach "Silver Mine Bay".

Almost Done!

This is "TUNG WAN TAU" the road along Silver Mine Bay and this section can be your
"Starting Point" as well and finish at Discovery Bay. 


Chillax Here!

SILVERMINE BEACH HOTEL
Drink & Dine here and you'll get the best out of food and scenery.
In here and you will be looking over at Silver Mine Beach
...and that's a good treat for a weekend hike!


Friendly Reminder
Enjoy Your Country Park, Enjoy Hiking and Leave No Trace!


Wednesday, April 17, 2013

SOUTH LO HON TOWER TRAIL

This is by far the most natural, the most extreme and challenging trail along side Lantau Peak., South Lo Hon Tower Trail is 100% natural from its starting point up to the end of the trail and only an expert and experienced Hiker/s are allowed to take the challenges of this trail as it is perilous to Novice Hikers. I highly suggest that if any Hiker/s, Team or Organization wish to try out this trail...one must consider the danger involve. 

Trail Info:
-Difficulty: 4.5 / 5
-Duration: 5 hrs (from: Main Entry Point)

Logistics:
- (Note: If your an expert Hiker you must know what to bring on this type of hiking expedition).

Transportation:
-Via Mini Bus #34: Ride for about 15mins from Tung Chung Bus Terminal until u reach the Shuttle Bus Terminal at SHEK MUN KAP Village

-Via Foot: Walk for about 30mins from Tung Chung MTR Station to Shek Mun Kap.

-Via Taxi: 10 mins from Tung Chung Taxi Terminal along Exit A (Blue Taxi).

LET'S GO!

If you decide to take this Shuttle Bus 34 from Tung Chung Bus Terminal, you will get off at the Shuttle Bus  Terminal at SHEK MUN KAP Village.

Follow the path towards Lo Hon Monastery uphill - for some, this is an easy walk along the pavement!

While walking uphill, this is what your going to see...as if it's teasing or inviting a hiker/s!

This Clean & Clear Stream is very relaxing and refreshing  for a Pit-Stop. 

This is still part of warm-up stage as you work your way towards the Main Starting Point.

Don't get lost and follow the leader!

When you notice these signage on the left side then you are almost close to the
Main Entry Point...try to save energy on this pavement!

MAIN ENTRY POINT
As you can see, the Expert Hikers are gathered together to utter their salutation
before taking their first step at the main entry point. 

...and the ACTION BEGIN!

Negotiate carefully along these moving rocks!

Gathering Station I
Here is where everyone can have a bit of rest and refueling, have some power bar or
anything to regain your energy back and after a short break, that clearly marked trail (in red)  is going to be you next Hiking, Climbing and Bouldering path....be slow and careful here!

This is what I meant about steep climb...a slight  Bouldering / Climbing to negotiate with.

Always try to keep your head up and look for your bearing point, that
clearly marked location / destination is... LO HON TOWER.

Gathering Section II
This is flat and open section where everyone can have power meal
 before taking another non-stop push towards "ROOSTER ROCK".

ROOSTER ROCK
Using a little bit of imagination and you can easily determine that
this rock formation really like a Rooster's Head.

Final push after the Rooster Rock and U will get to Lo Hon Tower & The Lo Hon Tower Cave. Be sure to get inside the caving and pay a little tribute! Inside the caving, U can see a lot of hikers ribbon to identify that a certain team of hikers has been there. The Clearly marked route will take you towards your choice of "END POINT". 

Here are the Team of Mountaineers that I cater inside the Cave.

Here's what it may look like when U take a photo of someone inside the Cave. The Hiker pointing on the
right is LO HON TOWER & on the left side is the wall of LO HON TOWER CAVE.

LANTAU PEAK
After choosing our destination and meet the other hikers along the way....we decided to climb on top of
LO HON TOWER CAVE and Cross-Over towards LANTAU PEAK.
(other Mountaineers Tackled North Lo Hon Tower Trail)

When you reach the Summit of Lantau Peak, there are plenty of choices to end your journey:
- Ngong Ping 360 (at Lantau Buddah)
- Dog Teeth Trails: West, Middle & East
- Ngong Ping Campsite
- Pak Kung Au

Some highlights of the trail as we finish our hiking trip at Pak Kung Au.

On a fine and clear day...this is another highlight of the trail...and just around here is a shelter where you can have  another break and maybe wait for a magical sunset to happen.

The sky is clear and the temperature is low and our hiking is almost done and here's what I say  so...
a Beautiful Sunset!


Friendly Reminder
Enjoy Your Country Park, Enjoy Hiking and Leave No Trace!

Monday, March 18, 2013

TIGER ROAR (ROCK RIVER) TRAIL

This trail is known for its extreme terrain and a very experience hiker or trekker must take the challenge. This is not advisable to novice or beginning hikers. Negotiating through the rocks specially at the "RIVER ROCK"  is dangerous because the rocks are moving and it could cause serious damage to other hikers below, so be sure to spread out when taking the River Rock section. 

Overall, this trail is physically demanding but very enjoyable! Good Luck!

TRANSPORTATION:
 There are many range of transportation to SHEK PIK Reservoir, some of which is Lantau Bus 11 or 23 from  Tung Chung MTR Station, Lantau Bus 2 from Mui Wo Ferry Terminal and more...just check the bus route board at Mui Wo Ferry Terminal (Silvermine Bay Ferry Terminal). 

Going back to the city depends on where you wish to finish this trail. The Loop type takes you back to Shek Pik Reservoir (Via Middle Dog Teeth Trail to Shek Pik Country Trail). Point A to Point B type is to finish at The Lantau Peak (Buddha), the other is through PAK KUNG AU, another one is through EAST DOG TEETH TRAIL, MIDDLE DOG TEETH TRAIL and finally via "WEST DOG TEETH TRAIL" then Shek Pik Country Trail towards Shek Peak Reservoir (another loop type).

TRAIL INFO:
- Difficulty: 4/5 (1: Very Easy - 5: Very Difficult)
- Terrain: All Natural
- Duration: 4 to 5 hours (for expert hikers)

LOGISTICS:
- 2L to 3L of water (depending on your ability to control liquid intake, be sure to stay hydrated on summer).
- Food / Power Bars / Fruit / Snack (whichever you wish to take during break)
- Power Drink
- Hiking Pole (Optional)
- Layered Clothing (be sure to wear convertible  pants).
- Good & Spiky Hiking shoes
- Mosquito repellent (only during wet season)
- First aid kit (solo kit)

LET'S GO!


ENTRY GATE
This entry gate is located near the Shek Pik Reservoir and this service to many hiking trail locations.

WARM UP SECTION
This tarmac pathway will serves as your warm-up while locating the main entrance of Tiger Roar Trail.  Just walk along the water catchment and the BBQ section until you reach the Entry Point.


MAIN ENTRANCE
Pass through the metal railing and the adventure begins.

ENTRY POINT
You will need to follow the "Gutter" all the way to the end until you reach the first Dry Stream climb.

This will be your first obstacle to endure on this trail and  you need to negotiate through  the clearly marked climbing section 'til you reach the top.

After reaching the top section of the climb, all you need to do now is to follow the dry rocky stream uphill. Some of the section are marked with white ribbon or red ribbon or sometimes white plastic bag wrapped around the tree branch...be sure to peel your eyes to easily spot them all. If you don't see any hanging ribbon or plastic bag around...just follow your instinct and head uphill thru the dry stream.

This part of the trail has no over hanging ribbons, just work your way up dry stream.

The 1st Wall Corridor and it is clearly marked (in red triangle) now for you to venture easily. Take a bit of rest here and refresh yourself or maybe eat your favorite fruit  (^_^) 

Clearly marked sections where you can climb uphill and the best  choice is the RED section  even though  BLUE & YELLOW are relatively easy section...but you are more likely to drop a stone on the climber behind you because the rocks are very loose.

The 2nd Corridor
Again, because of the obvious reasons...you need to work your way uphill and follow the dry stream.

FINAL ASSAULT
This part of the trail of the trail is wet (specially the red section) so you need to be careful not to slip or you will experience hard and painful fall. Try negotiating through  the yellow path if it works best for you!

OPEN ZONE
Finally, you reach the base of the "Rock River" and this is the OPEN ZONE after battling your way out through the "Dry Stream" Jungle
Look back and see the place where you've been thru... It's breath taking isn't it?!
you will definitely get a great view during clear sky.  


"RIVER ROCK"
Here is the main reason why you need to take the challenge of TIGER ROAR TRAIL!
River Rock has its name from all the rocks seemingly flowing in this section instead of water.
Again, you need to be very careful in this section because the rocks are very loose...spread out when  taking the challenge directly thru the rocks and make sure no one's behind you...(you don't wanna be liable for the other hikers injury!) 

This Photo was taken at the Summit of River Rock while looking down at the other Hikers as they try to reach the top.

LAST WORDS
Enjoy Hiking and Leave No Trace!

Friday, February 22, 2013

MOUNT CAMERON

MOUNT CAMERON - is a fairly easy trail for those who wish to experience outdoor hiking activity. The best part of this trail is when you reach the summit because you will have a 360 degrees of beautiful scenery such as the Aberdeen Reservoir, The Peak, The Victoria Habour, Kowloon, Happy Valley, Jardine's Lookout and many more.

TRAIL INFO:
- Difficulty: 3/5
-Terrain: Natural 80% & 20% Tarmac
-Duration: 2.5hrs
-Distance: 3.5km - 4.5 (Depending on your end zone)

TRANSPORTATION:
-Take Bus 15 heading towards the Peak and get off at Wan Chai Gap Road. (Police Museum)
-Walk uphill using the path "MIDDLE GAP ROAD".
-When U reach the "End Zone" you will encounter a signage that will lead you back to Wan Chai Gap Road (Left turn while facing the signage) and from there you can take Bus 15 again to return to the city. The other direction (To the Right) will lead you all the way down to Black's Link and when U reach the end of it, just turn a little to the left and U will see the Bus station the will get U back into the city (There's plenty of choices!)

LOGISTIC:
-8L - 18L Pack
-1 Liter of Water
-Fruit/Power Bar/Power Gel (Anything will do just fine)
-Wear Long Sleeves or Arm protector (To prevent scratches)
-Pair of Eye Wear (Preventive measure from getting poke in the eye from trees branches)
-Hiking Pole (nope! you can actually hold on to the trees as you climb)
-Light Weight Material Clothing Gears
-Personal First Aid Kit.
-Camera

LET'S GO


STARTING AREA

Peel your eyes and be vigilant to the over hanging ribbon because  this will lead you towards the summit of Mt. Cameron.

When you reach the open section of the trail...you will have a warm greeting from the summit as if it's inviting  you! This section have some beehive around so be careful not to get stung!

Mount Cameron Summit

The Beautiful Mount Nicholson, on the right side of this photo is where I descend and this is the quickest way to meet Mount Cameron but the other descend to the right side will lead you down to Hong Kong Trail Section 4 and it's a bit longer to finish than the left descend.

Here is the trail leading down from mount Cameron and along the trail U will always have Mount Nicholson  ahead of you. You will have to negotiate thru the rusty old pipes that used to supply the neighboring community.

VIEWING ROCK
A perfect place to chill and take a few memorabilia (Photos) of you and the mountain rage ahead, specially the  section where U can see "HAPPY VALLEY" and "The Victoria Harbour"

END ZONE
You will have to take this couple of steps and pass around the gateway.

DONE!

THE CHOICE IS YOUR!
Here is the section where you can end your journey. Whichever you choose will lead you back easily to the city and you will be walking thru the tarmac once again.


Friendly Reminder
Enjoy Your Country Park, Enjoy Hiking and Leave No Trace!